How to Configure an IPv6 Address in Ubuntu
Although the adoption of IPv6 addresses was slow from 2009 through 2015, it has accelerated in recent years. As of 2019, 26% of users accessing Google do so via an IPv6 address [Source]. Each Dedicated Server from OVHcloud is assigned a /64 block (1 subnet) of IPv6 addresses, which is 18,446,744,073,709,551,616 (18 quintillion 446 quadrillion 744 trillion 73 billion 709 million 551 thousand and 616) addresses. In this article, we will cover configuring an IPv6 address within Ubuntu.
Prerequisites
- Dedicated Server
- Unused IPv6 Address
- IPv6 Default Gateway
Note: Please note that for this article we are using the sample IPv6 block 2001:db8:100:15a::/64.
You can find the IPv6 block for your Dedicated Server under the "Network" section of the "Server status" tab within the OVHcloud Manager. Also, the default gateway is always the IPv6 block assigned to the Dedicated Server, but with the last 72 bits set to 1, which is defined using f's. Let's examine our IPv6 block and determine the default gateway:
- First set of 16 bits = 2001:
- Second set of 16 bits (32-bits total) = :0db8:
- Third set of 16 bits (48-bits total) = :0100:
- Fourth set of 16 bits (64-bits total) = :015a:
- Remaining set of 64 bits (65 - 128-bits total) = :0000:0000:0000:0000
As you can see 8 bits must be borrowed from the fourth set (i.e., :015a:) to add up to 72 bits. As a result, the "5" and "a" become f's and the default gateway in this example is: 2001:db8:100:1ff:ff:ff:ff:ff
Topics
- Configuring an IPv6 Address within Ubuntu 16.04
- Configuring an IPv6 Address within Ubuntu 18.04
Configuring an IPv6 Address within Ubuntu 16.04
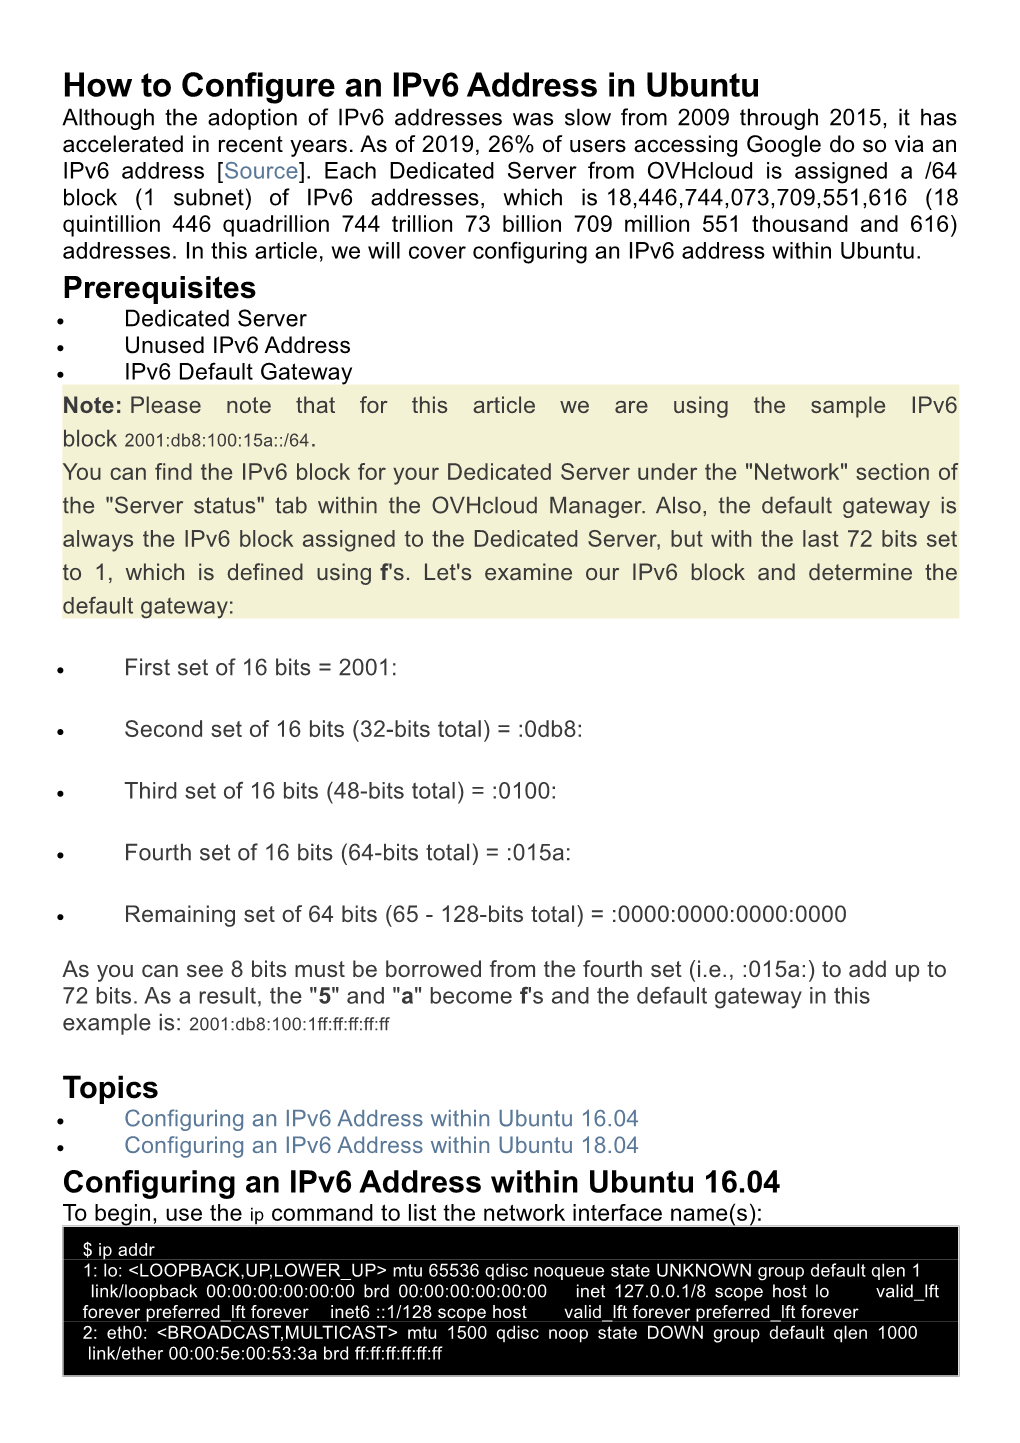
To begin, use the ip command to list the network interface name(s):
$ ip addr
1: lo: <LOOPBACK,UP,LOWER_UP> mtu 65536 qdisc noqueue state UNKNOWN group default qlen 1 link/loopback 00:00:00:00:00:00 brd 00:00:00:00:00:00 inet 127.0.0.1/8 scope host lo valid_lft forever preferred_lft forever inet6 ::1/128 scope host valid_lft forever preferred_lft forever
2: eth0: <BROADCAST,MULTICAST> mtu 1500 qdisc noop state DOWN group default qlen 1000 link/ether 00:00:5e:00:53:3a brd ff:ff:ff:ff:ff:ff
3: eth1: <BROADCAST,MULTICAST> mtu 1500 qdisc noop state DOWN group default qlen 1000 link/ether 00:00:5e:00:53:3b brd ff:ff:ff:ff:ff:ff
Note: Except for the Game server, all OVHcloud servers come with at least two NICs (Network Interface Cards). The first one, eth0 in our example, is used for public (i.e., Internet) traffic. The second one, eth1 in our example, is used for private networking. For more information on this, please check out our Getting Started with vRack article.
From the output, note the public interface name, which for us is eth0, as you will need it in the next step.
Next, open the /etc/network/interfaces file using a text editor of your choice:
$ sudo vi /etc/network/interfaces
Then, add the following content to the file:
iface eth0 inet6 static
address 2001:db8:100:15a::1
netmask 64
dns-nameservers 2001:41d0:3:163::1
post-up sleep 5; /sbin/ip -family inet6 route add 2001:db8:100:1ff:ff:ff:ff:ff dev eth0
post-up sleep 5; /sbin/ip -family inet6 route add default via 2001:db8:100:1ff:ff:ff:ff:ff
pre-down /sbin/ip -family inet6 route del default via 2001:db8:100:1ff:ff:ff:ff:ff
pre-down /sbin/ip -family inet6 route del 2001:db8:100:1ff:ff:ff:ff:ff dev eth0
Note: Please be sure to update the interface name (e.g., eth0) with your actual interface name, the IPv6 address (e.g., 2001:db8:100:15a::1) with an available IPv6 address from your /64 block, and the default gateway (i.e., 2001:db8:100:1ff:ff:ff:ff:ff) for your server. Also, if you prefer to use a third-party DNS server, replace the IPv6 address after "dns-nameservers" (2001:41d0:3:163::1) provided by OVHcloud.
If the state of the interface is DOWN, then use the ip command to bring it up:
$ ip link set eth0 up
Finally, use the systemctl command to restart the networking service:
$ sudo systemctl restart networking
Use the ping6 command to test that the system can communicate using an IPv6 address. We will use the IPv6 address that resolves to example.com:
$ ping6 2606:2800:220:1:248:1893:25c8:1946
If you receive a response, then you are good to go. If you do not, review the configuration for any inaccuracies and/or restart the operating system.
Configuring an IPv6 Address within Ubuntu 18.04
Canonical, the developer of Ubuntu, implemented the use of Netplan for easy-to-use network configuration as of version 17.x. However, as of this writing, a known issue with IPv6 configuration exists between Netplan and systemd.network (the system service that manages networks). Essentially, the IPv6 configurations are not properly relayed from Netplan to systemd.network. As a result, we will configure the IPv6 address with systemd.network, bypassing Netplan entirely.
To begin, use the ip command to list the network interface name(s):
$ ip addr
1: lo: <LOOPBACK,UP,LOWER_UP> mtu 65536 qdisc noqueue state UNKNOWN group default qlen 1 link/loopback 00:00:00:00:00:00 brd 00:00:00:00:00:00 inet 127.0.0.1/8 scope host lo valid_lft forever preferred_lft forever inet6 ::1/128 scope host valid_lft forever preferred_lft forever
2: eno1: <BROADCAST,MULTICAST> mtu 1500 qdisc noop state DOWN group default qlen 1000 link/ether 00:00:5e:00:53:3a brd ff:ff:ff:ff:ff:ff
3: eno2: <BROADCAST,MULTICAST> mtu 1500 qdisc noop state DOWN group default qlen 1000 link/ether 00:00:5e:00:53:3b brd ff:ff:ff:ff:ff:ff
Note: Except for the Game server, all OVHcloud servers come with at least two NICs (Network Interface Cards). The first one, eno1 in our example, is used for public (i.e., Internet) traffic. The second one, eno2 in our example, is used for private networking. For more information on this, please check out our Getting Started with vRack article.
From the output, note the public interface name, which for us is eno1, as you will need it in the next step.
Next, create the file 10-eno1.network in the /etc/systemd/network directory using a text editor of your choice:
$ sudo vi /etc/systemd/network/10-eno1.network
Note: We elected to name the file "10-eno1.network" because we are configuring the eno1 interface. However, the file can be name anything you would like as long as it ends with ".network".
Then, add the following content to the file:
[Match]
Name=eno1
[Network]
DHCP=ipv4
Gateway=2001:db8:100:1ff:ff:ff:ff:ff
DNS=2001:41d0:3:163::1
[Address]
Address=2001:db8:100:15a::1/64
[Route]
Destination=2001:db8:100:1ff:ff:ff:ff:ff
Scope=link
Note: Please be sure to update the value for "Name" (e.g., eno1) with your actual interface name, the value for "Address" (e.g., 2001:db8:100:15a::1) with an available IPv6 address from your /64 block, the value for "Gateway" and "Destination" (i.e., 2001:db8:100:1ff:ff:ff:ff:ff) with the default gateway for your server. Also, if you prefer to use a third-party DNS server, replace the IPv6 address after "dns-nameservers" (2001:41d0:3:163::1) provided by OVHcloud.
Finally, use the systemctl command to restart the networking service, apply the configuration, and bring up the interface.
$ sudo systemctl restart systemd-networkd
Use the ping6 command to test that the system can communicate using an IPv6 address. We will use the IPv6 address that resolves to example.com:
$ ping6 2606:2800:220:1:248:1893:25c8:1946
If you receive a response, then you are good to go. If you do not, review the configuration for any inaccuracies and/or restart the operating system.
Conclusion
Having read this article, you should be familiar with the steps required to configure Ubuntu with an IPv6 address.