Shopware 6
Step 3: Database setup
Version
6.0.0 or newer
Table of contents
o Setting up a migration
The plugin is fully setup, yet it's not doing anything as of now.
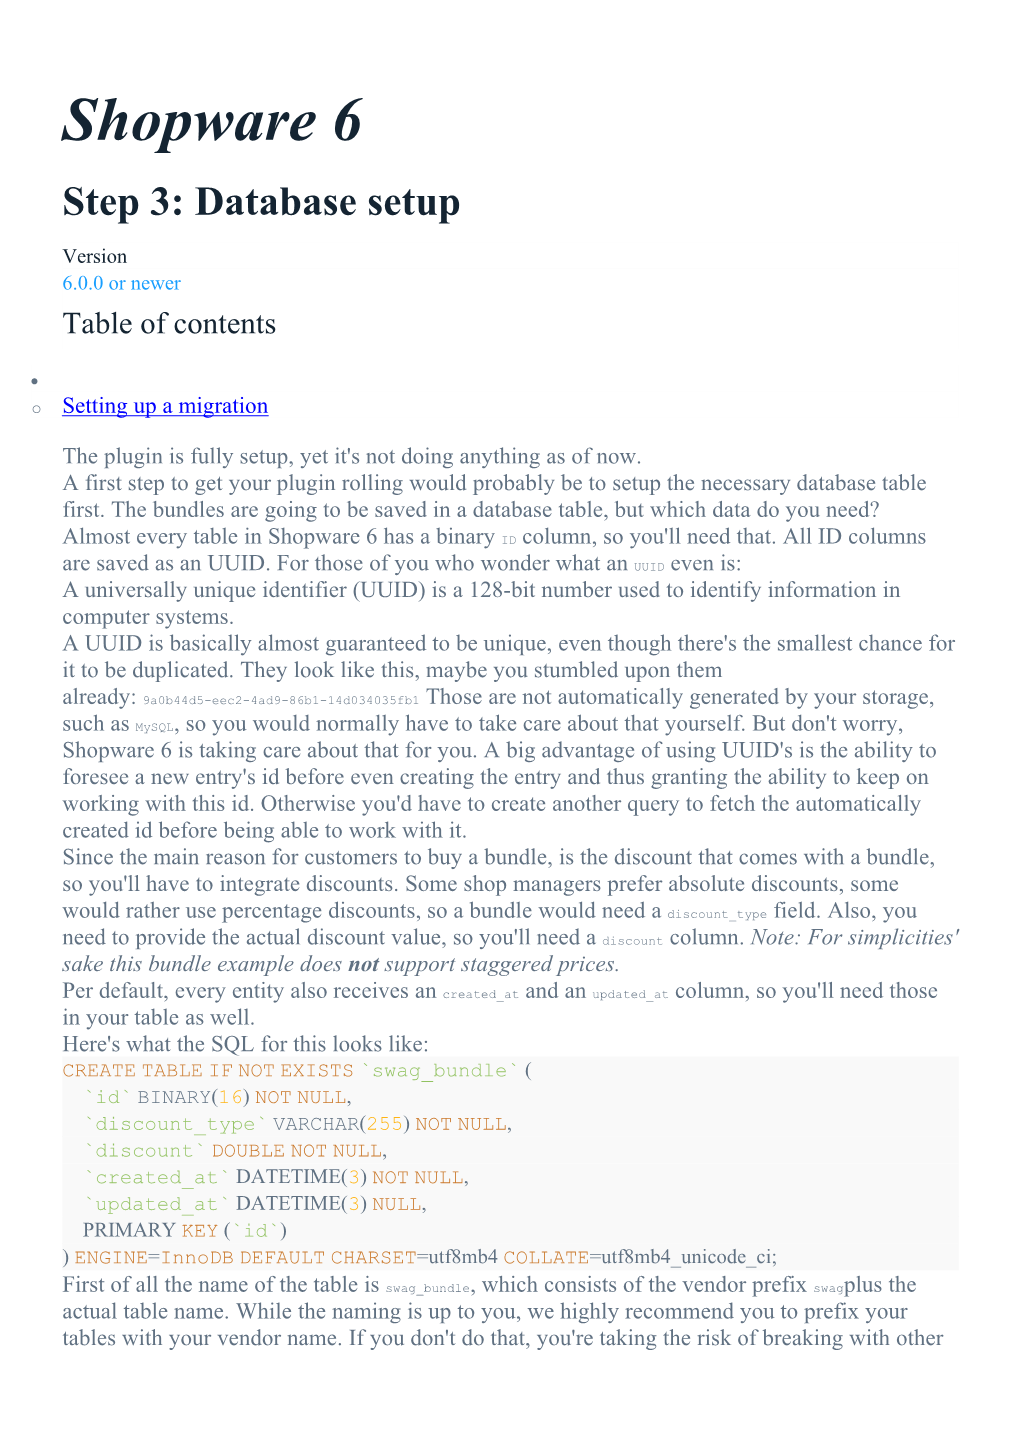
A first step to get your plugin rolling would probably be to setup the necessary database table first. The bundles are going to be saved in a database table, but which data do you need?
Almost every table in Shopware 6 has a binary ID column, so you'll need that. All ID columns are saved as an UUID. For those of you who wonder what an UUID even is:
A universally unique identifier (UUID) is a 128-bit number used to identify information in computer systems.
A UUID is basically almost guaranteed to be unique, even though there's the smallest chance for it to be duplicated. They look like this, maybe you stumbled upon them already: 9a0b44d5-eec2-4ad9-86b1-14d034035fb1 Those are not automatically generated by your storage, such as MySQL, so you would normally have to take care about that yourself. But don't worry,
Shopware 6 is taking care about that for you. A big advantage of using UUID's is the ability to foresee a new entry's id before even creating the entry and thus granting the ability to keep on working with this id. Otherwise you'd have to create another query to fetch the automatically created id before being able to work with it.
Since the main reason for customers to buy a bundle, is the discount that comes with a bundle, so you'll have to integrate discounts. Some shop managers prefer absolute discounts, some would rather use percentage discounts, so a bundle would need a discount_type field. Also, you need to provide the actual discount value, so you'll need a discount column. Note: For simplicities' sake this bundle example does not support staggered prices.
Per default, every entity also receives an created_at and an updated_at column, so you'll need those in your table as well.
Here's what the SQL for this looks like:
CREATE TABLE IF NOT EXISTS `swag_bundle` (
`id` BINARY(16) NOT NULL,
`discount_type` VARCHAR(255) NOT NULL,
`discount` DOUBLE NOT NULL,
`created_at` DATETIME(3) NOT NULL,
`updated_at` DATETIME(3) NULL,
PRIMARY KEY (`id`)
) ENGINE=InnoDB DEFAULT CHARSET=utf8mb4 COLLATE=utf8mb4_unicode_ci;
First of all the name of the table is swag_bundle, which consists of the vendor prefix swagplus the actual table name. While the naming is up to you, we highly recommend you to prefix your tables with your vendor name. If you don't do that, you're taking the risk of breaking with other plugins, that created the same table. By providing a unique table name, you prevent that possible issue.
Setting up a migration
Shopware 6 uses a migration system to install and update a plugin's database setup. Make sure to always use the migration system when setting up database tables or updating their structure!
Migrations are executed when installing and updating your plugin. In order to create a new table, you'll need one of those migrations. They are automatically loaded and executed, if you place them in the proper directory. By default, those are expected to be in a Migration directory, relative to your plugin's base class. Since your base class' location is the src directory, that's also where the Migration directory has to be in: plugin root /src/Migration
After creating the directory, create a new PHP file in there. Its name has to follow this pattern: Migration UnixTimeStap MigrationName .php A real example would then look like this: Migration1554708925Bundle.php
You can get the current UNIX timestamp from here or any other source. Make sure to note down this timestamp, you'll need it in a minute. The name can be freely chosen, in this case
"Bundle" is enough.
The actual PHP class has to be named after the filename, so Migration1554708925Bundlethat is. Your migration has to extend from the class Shopware\Core\Framework\Migration\MigrationStep .
You'll now be asked to implement three methods: getCreationTimestamp, update and updateDestructive getCreationTimestamp
Simply return the timestamp here, that you've used in the class name. Return it as an integer. This timestamp will be saved into the database table `migration`, so Shopware 6 can keep track of which migrations were executed already and which ones are still necessary. update
Updates done in here have to be reversible, like creating a database table or a nullable column. updateDestructive
This reflects the counter part to the `update` method - all non-reversible updates have to be made here. Examples for destructive changes are dropping a table or removing columns.
Since you're just going to create a new table, you can use the update method. Both update-methods have access to a DBAL connection in order to actually execute their database actions.
So this is, what your Migration should look like now, including the SQL statement to create the table:
?php declare(strict_types=1); namespace Swag\BundleExample\Migration; use Doctrine\DBAL\Connection; use Shopware\Core\Framework\Migration\MigrationStep; class Migration1554708925Bundle extends MigrationStep
{public function getCreationTimestamp(): int
{return 1554708925; }public function update(Connection $connection): void
{
$connection- executeQuery('
CREATE TABLE IF NOT EXISTS `swag_bundle` (
`id` BINARY(16) NOT NULL,
`discount_type` VARCHAR(255) NOT NULL,
`discount` DOUBLE NOT NULL,
`created_at` DATETIME(3) NOT NULL,
`updated_at` DATETIME(3) NULL,
PRIMARY KEY (`id`)
) ENGINE=InnoDB DEFAULT CHARSET=utf8mb4
COLLATE=utf8mb4_unicode_ci;
');
}public function updateDestructive(Connection $connection): void
{
}
}
Expand code
The updateDestructive method is empty, since you don't have to execute any destructive changes.
The database will be setup once you install your plugin. If you've done that already, you'll have to reinstall your plugin.
Head over to the next step to introduce your new database tables to Shopware 6.
Step 4: Creating an entity
Version
6.0.0 or newer
Table of contents
o Registering the custom definition
While it's good to have the database tables running already, Shopware 6 does not know your new table yet.
Introducing the table to Shopware 6 is done by adding a so called EntityDefinition for your table.
As the name suggests, it defines your own entity, including its fields and name, the latter also represents the table name and therefore has to perfectly match. While it's up to you where to place your custom definition, we would recommend to stick to the Core structure. Thus, a good location for it would be in a directory like this: plugin root /src/Core/Content/Bundle Create a new file called BundleDefinition.php in there.
Your own definition has to extend from the class Shopware\Core\Framework\DataAbstractionLayer\EntityDefinition, which, once again, enforces you to implement two methods: getEntityName and defineFields getEntityName: Return a string equal to your table name. In this example it is swag_bundle .defineFields :
This method contains all the fields, that your entity or table consists of. You've got an id field, adiscount_type field and a discount field. The other two columns created_at and updated_at don't have to be defined here, they're included by default. You're asked to return aShopware\Core\Framework\DataAbstractionLayer\FieldCollectioninstance here, which then has to contain an array of your fields. There's several field classes, e.g. an Shopware\Core\Framework\DataAbstractionLayer\Field\IdField or aShopware\Core\Framework\DataAbstractionLayer\Field\StringField, which you have to create and pass into the FieldCollection. Have a look here for a full list of available fields and their description.
This is how your BundleDefinition should look like now:
?php declare(strict_types=1); namespace Swag\BundleExample\Core\Content\Bundle; use Shopware\Core\Framework\DataAbstractionLayer\EntityDefinition; use Shopware\Core\Framework\DataAbstractionLayer\Field\Flag\PrimaryKey; use Shopware\Core\Framework\DataAbstractionLayer\Field\Flag\Required; use Shopware\Core\Framework\DataAbstractionLayer\Field\FloatField; use Shopware\Core\Framework\DataAbstractionLayer\Field\IdField; use Shopware\Core\Framework\DataAbstractionLayer\Field\StringField; use Shopware\Core\Framework\DataAbstractionLayer\FieldCollection; class BundleDefinition extends EntityDefinition
{public const ENTITY_NAME = 'swag_bundle'; public function getEntityName(): string
{return self::ENTITY_NAME;
}protected function defineFields(): FieldCollection
{return new FieldCollection([
(new IdField('id', 'id'))- addFlags(new Required(), new PrimaryKey()),
(new StringField('discount_type', 'discountType'))- addFlags(new Required()),
(new FloatField('discount', 'discount'))- addFlags(new Required()),
]);
}
}
Expand code
The getEntityName method should be self explaining here, so let's have a look at the defineFields instead. As explained earlier and as the return type suggests, you're supposed to return a new FieldCollection here.
Its constructor requires you to pass an array, which is meant to contain all Fields, which are used in your entity. The first item in this array is an IdField. Most fields ask for two parameters, such as the IdField :
A storage name, which represents the name of the field in the storage, e.g. the column in an SQL database. A property name, which defines how you can access this field later on. Make sure to remember those for the next step.
The storageName is written in snake_case, while the propertyName must be written in lowerCamelCase .
Additionally, two flags are added to the IdField. But what is a flag in the first place? One could describe them as 'additional information' of a field, such as defining a field as required or setting it as a primary key. Have a look here for a reference documentation. And that's also the two flags, that were used on this field: Required and PrimaryKey The Required flag let's the data abstraction layer know, that this field is not optional and must always be set. Using the PrimaryKey flag is important, so the data abstraction layer knows which field to use when working with associations and foreign keys.
The next two items are a StringField for the discount type and a FloatField for the actual discount, that will be applied to this bundle. Both are defined as Required, so you can make sure those values are always set and you don't have to take care of any kind of default value. Also, a bundle without a discount would make no sense.
Setting up the entity and collection
When fetching for your bundle data now, you'd get an EntityCollection of Entity classes now, each one representing a configured bundle. Both the EntityCollection as well as the Entity class are generic classes, thus not providing any auto-completion while developing. If you create your own EntityCollection and Entity instead, you'll have auto-completion for your custom entity. This will come in handy later in this tutorial and in general when developing your plugin.
Let's start with a custom Entity class, a good name for it would be BundleEntity. Simply create this class in the same directory like your BundleDefinition. Your BundleEntity class has to extend from Shopware\Core\Framework\DataAbstractionLayer\Entity .
Your entity should now contain every field, that you already defined in the EntityDefinition. Each field has to come with a getter and a setter.
The id property can and should be integrated by using the trait Shopware\Core\Framework\DataAbstractionLayer\EntityIdTrait in your class. It adds an $id property plus the respective getter and setter methods. Now add the other two fields discountType and discount to your entity as well. Just make sure that you use the same names for the properties you already specified in the definition. Once more, do not add the createdAt and updatedAt fields here, they are automatically added by extending from the Entity class.
This is how your BundleEntity should look like now:
?php declare(strict_types=1); namespace Swag\BundleExample\Core\Content\Bundle; use Shopware\Core\Framework\DataAbstractionLayer\Entity; use Shopware\Core\Framework\DataAbstractionLayer\EntityIdTrait; class BundleEntity extends Entity
{use EntityIdTrait;
/**
* @var string
*/ protected $discountType; /**
* @var float
*/ protected $discount; public function getDiscountType(): string
{return $this- discountType;
}public function setDiscountType(string $discountType): void
{
$this- discountType = $discountType;
}public function getDiscount(): float
{return $this- discount;
}public function setDiscount(float $discount): void
{
$this- discount = $discount;
}
}
Expand code
Your entity is not used yet though, since your definition does not know your new class.
The EntityDefinition class provides a method called getEntityClass and returns the fully qualified class name of the Entity class to be used. Override this method to return your custom entity's class name now: class BundleDefinition extends EntityDefinition
{
... public function getEntityClass(): string
{return BundleEntity::class;
}protected function defineFields(): FieldCollection
...
}
Your BundleEntity is now used by your BundleDefinition, so the EntityCollection will be a set of BundleEntity classes now instead of generic Entity classes. Time to make sure you're also using a custom EntityCollection, which works the very same way like setting a custom entity. There's another method called getCollectionClass, which can be overridden in your BundleDefinition as well, so also add this: class BundleDefinition extends EntityDefinition
{
... public function getCollectionClass(): string
{return BundleCollection::class;
}protected function defineFields(): FieldCollection
...
}
And now create the BundleCollection class in the same directory as your
Shopware 6