Initial LPAC Meetings using Meeting Mode
As you are getting ready for your Initial LPACs, here are the steps you should follow to complete the process using the Meeting Mode in Project ELL:
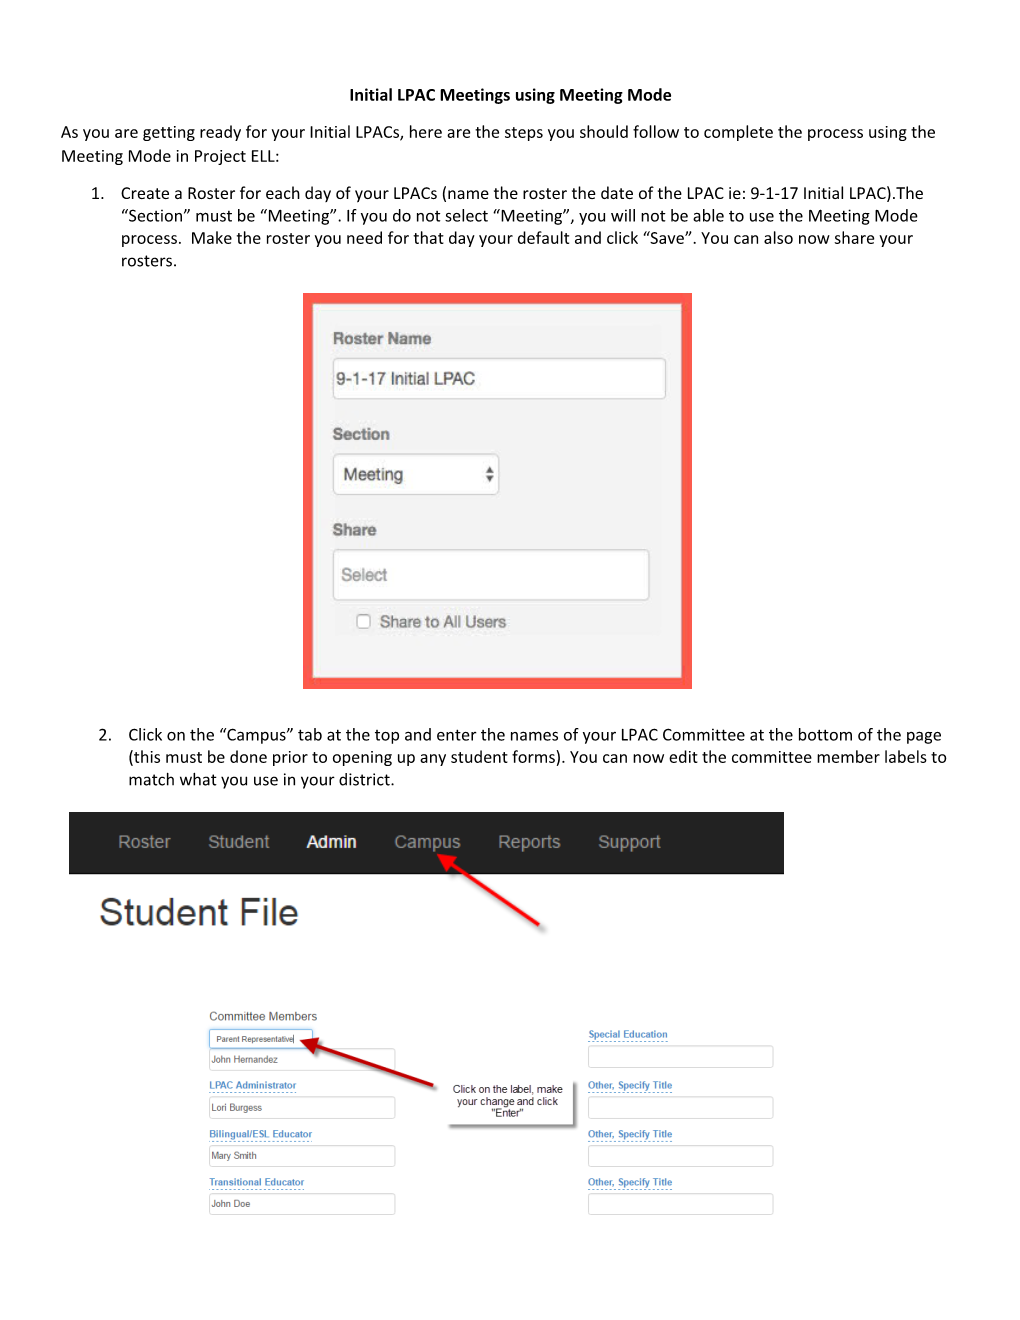
- Create a Roster for each day of your LPACs (name the roster the date of the LPAC ie: 9-1-17 Initial LPAC).The “Section” must be “Meeting”. If you do not select “Meeting”, you will not be able to use the Meeting Mode process. Make the roster you need for that day your default and click “Save”. You can also now share your rosters.
- Click on the “Campus” tab at the top and enter the names of your LPAC Committee at the bottom of the page (this must be done prior to opening up any student forms). You can now edit the committee member labels to match what you use in your district.
The following steps outline the process for holding meetings using the Meeting Mode functionality.
- Create a roster for the students you will be meeting on for that day.
Note: You can copy a pre-populated roster and change the Section to “Meeting”. This is especially helpful for your “Pending” students.
- Enter the Roster Name (ie: 9-1-17 Initial LPAC Meeting).
- Select “Meeting” under Section (this is imperative if you are wanting to use Meeting Mode).
- Add filters and select students to add to the roster (Note: you can now share rosters).
- Click Save (check “Default” if you want this roster to display automatically).
- Click “Meeting Mode”.
- Select the forms that will be needed during the meeting. Multiple forms can be selected but you must add them one at a time.
- Click “Add Form” for any needed form and then click “OK”
- To start the meeting, click the “Start” button.
- Enter the information on the form and click “Save”; forms can be printed for each student or they can be bulk printed at the end.
- If you have selected multiple forms, you can click “Next Form” and it will display the second form in the list; if you only have one form or do not need additional forms for this student, click “Next Student” and the first form will display for the next student. Repeat this process until you have completed forms for all of the students on your roster.
- Click “Exit Meeting Session” when you are finished
- To bulk print, submit and archive, click on “Forms” from the top black tool bar
- Add filters and click “List Forms”; the system will display students who meet the filter criteria (see screenshot below)
- Saved – displays forms that need to be submitted and/or printed
- Action – displays forms that need to be archived and/or printed
Note: Parent Letters are printed under the Action section
- Archived – displays forms to print that have been archived
- Click students you want or check the box on top to select all students
- Buttons will be highlighted based on what you are able to do with the student’s selected
***Please note that at this time you are not able to bulk archive Initial LPAC Plans. This is due to the fact that you must go into each student’s file and enter the date of parental consent (see screenshot below). Once you have entered the Date of Parental Consent, you will be able to click “Yes” or “No” based on whether or not consent was given.
- The TX Initial LPAC Summary Report is very useful at this time of year. Go to the Reports area in the black ribbon at the top of the screen. Select your report and any other filters that you need. Click “Run Report” for the data you need regarding your Initial LPAC meetings.
