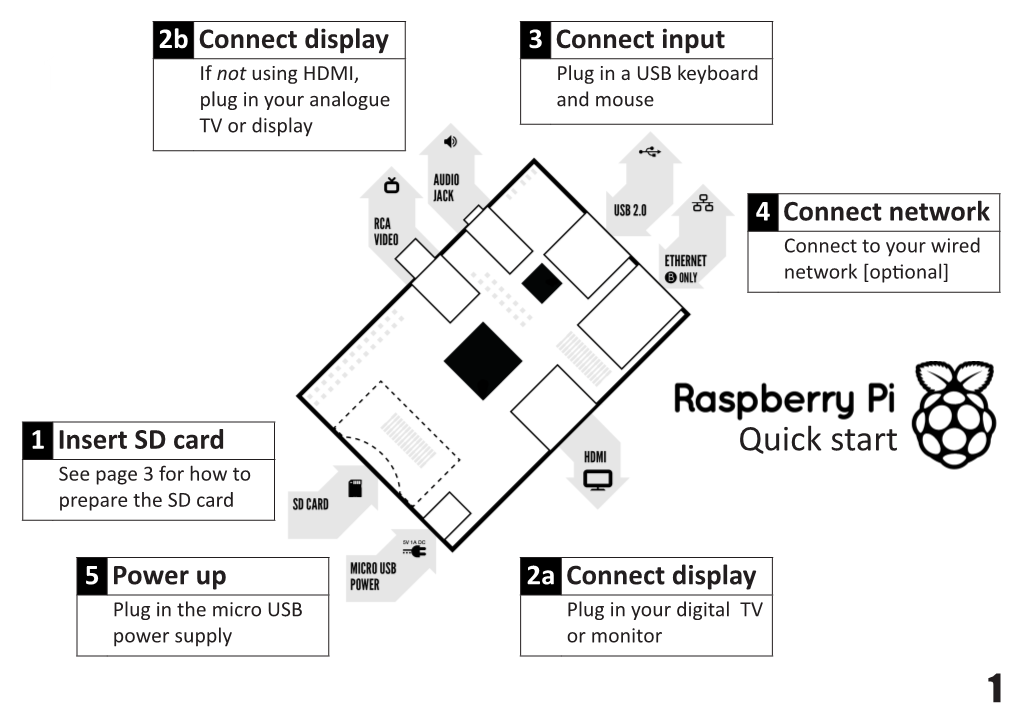
2b Connect display 3 Connect input
If not using HDMI, plug in your analogue and mouse
TV or display
Plug in a USB keyboard 1
4 Connect network
Connect to your wired network [opꢀonal]
1 Insert SD card
Quick start
See page 3 for how to prepare the SD card
5 Power up 2a Connect display
Plug in the micro USB
Plug in your digital TV power supply or monitor
1To set up your Raspberry Pi you will need:
Item Minimum recommended specificaꢀon notes
1SD card • Minimum size 4Gb; class 4 (the class indicates how fast the card is).
• We recommend using branded SD cards as they are more reliable.
2a HDMI to HDMI / DVI lead • HDMI to HDMI lead (for HD TVs and monitors with HDMI input).
OR
HDMI to DVI lead (for monitors with DVI input).
• Leads and adapters are available for few pounds -- there is no need to buy expensive ones!
2b RCA video lead
• A standard RCA composite video lead to connect to your analogue display if you are not using the HDMI output.
3Keyboard and mouse • Any standard USB keyboard and mouse should work.
• Keyboards or mice that take a lot of power from the USB ports, however, may need a powered USB hub. This may include some wireless devices.
4Ethernet (network) cable • Networking is opꢀonal, although it makes updaꢀng and geꢁng new
[opꢀonal] soꢂware for your Raspberry Pi much easier.
5Power adapter • A good quality, micro USB power supply that can provide at least
700mA at 5V is essenꢀal.
• Many mobile phone chargers are suitable—check the label on the plug.
• If your supply provides less than 5V then your Raspberry Pi may not work at all, or it may behave erraꢀcally. Be wary of very cheap chargers: some are not what they claim to be.
• It does not maꢃer if your supply is rated at more than 700mA.
6Audio lead [opꢀonal] • If you are using HDMI then you will get digital audio via this.
• If you are using the analogue RCA connecꢀon, stereo audio is available from the 3.5mm jack next to the RCA connector.
Know your leads:
HDMI connector
HDMI to DVI lead
RCA composite video connector
2Preparing your SD card for the Raspberry Pi
The SD card contains the Raspberry Pi’s operaꢀng system (the OS is the soꢂware that makes it work, like Windows on a PC or OSX on a Mac). This is very different from most computers and it is what many people find the most daunꢀng part of seꢁng up their Raspberry Pi. It is actually very straighꢄorward— just different!
The following instrucꢀons are for Windows users. Linux and Mac users can find instrucꢀons at
1. Download the Raspberry Pi operating system
The recommended OS is called Raspbian. Download it here:
hꢃp://downloads.raspberrypi.org/images/raspbian/2012-12-16-wheezy-raspbian/2012-12-16-wheezy-raspbian.zip
2. Unzip the file that you just downloaded a) Right click on the file and choose “Extract all”. b) Follow the instrucꢀons—you will end up with a file ending in .img
This .img file can only be wriꢃen to your SD card by special disk imaging soꢂware, so…
3. Download the Win32DiskImager software a) Download win32diskimager-binary.zip (currently version 0.6) from:
hꢃps://launchpad.net/win32-image-writer/+download b) Unzip it in the same way you did the Raspbian .zip file c) You now have a new folder called win32diskimager-binary
You are now ready to write the Raspbian image to your SD card.
4. Writing Raspbian to the SD card a) Plug your SD card into your PC b) In the folder you made in step 3(b), run the file named Win32DiskImager.exe
(in Windows Vista, 7 and 8 we recommend that you right-click this file and choose “Run as administrator”). You will see something like this: c) If the SD card (Device) you are using isn’t found automaꢀcally then click on the drop down box and select it
3d) In the Image File box, choose the Raspbian .img file that you downloaded e) Click Write f) Aꢂer a few minutes you will have an SD card that you can use in your Raspberry Pi
5. Booting your Raspberry Pi ꢀor the first time a) Follow the Quick start guide on page 1 b) On first boot you will come to the Raspi-config window c) Change seꢁngs such as timezoneand localeif you want d) Finally, select the second choice: expand_rootfs and say ‘yes’ to a reboot e) The Raspberry Pi will reboot and you will see raspberrypi login: f) Type: pi g) You will be asked for your Password h) Type: raspberry i) You will then see the prompt: pi@raspberry ~ $ j) Start the desktop by typing: startx k) You will find yourself in a familiar-but-different desktop environment. l) Experiment, explore and have fun!
For more details and where to go next visit and the forums at
The latest version of Raspbian can always be found at
4
Raspberry Pi Quick Start Guide