V.2
Simon Carlsson
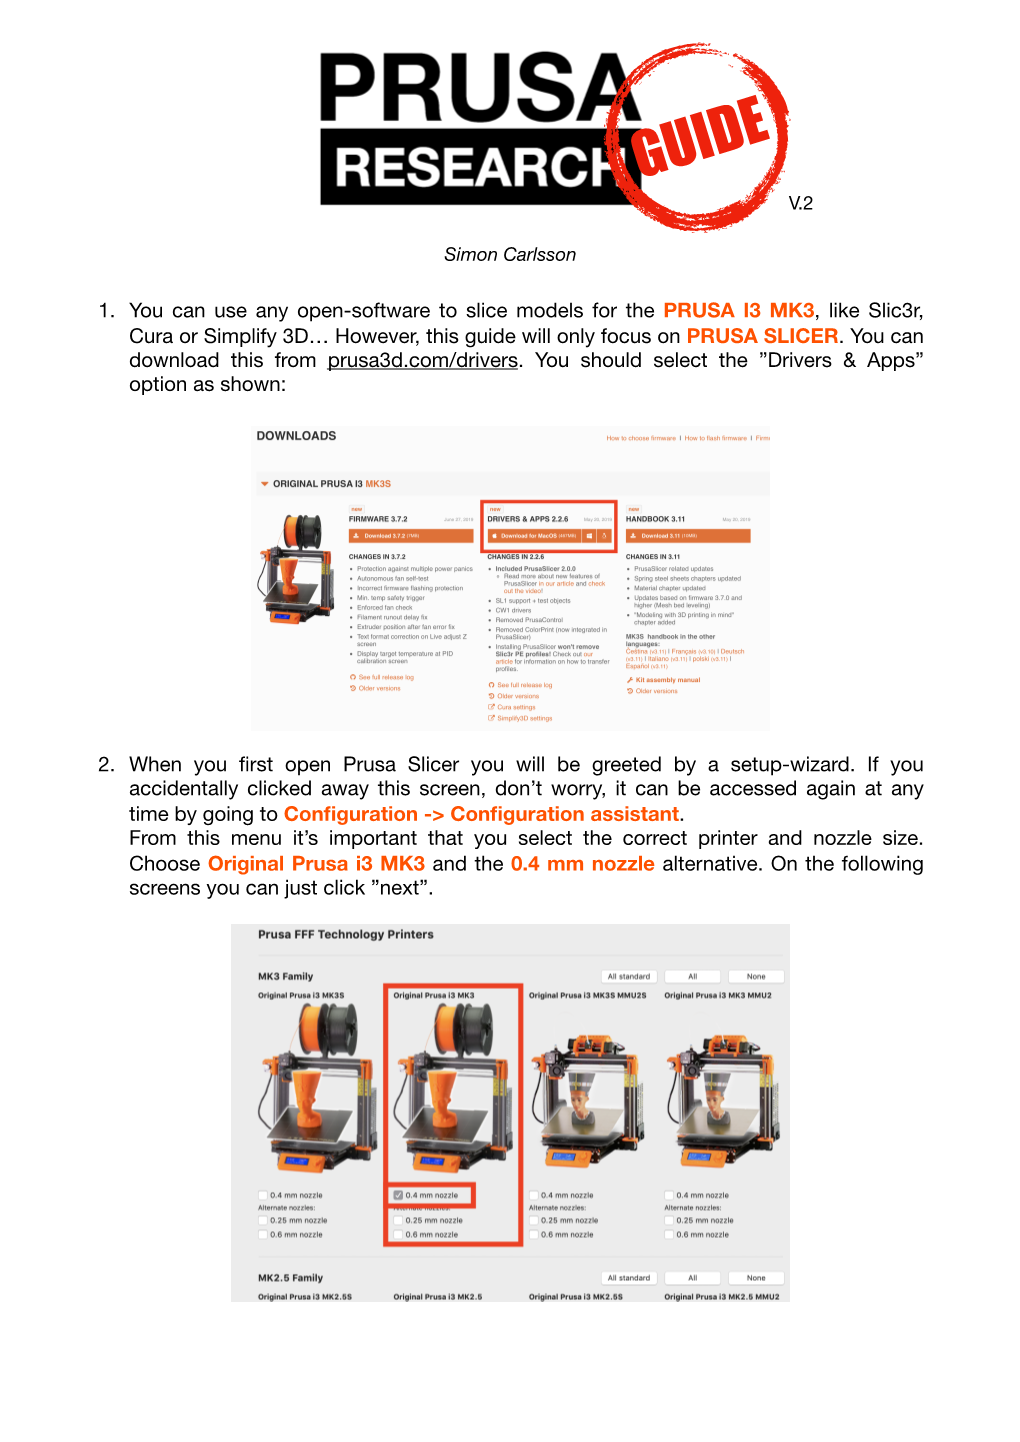
1. You can use any open-software to slice models for the PRUSA I3 MK3, like Slic3r,
Cura or Simplify 3D… However, this guide will only focus on PRUSA SLICER. You can download this from prusa3d.com/drivers. You should select the ”Drivers Apps” option as shown:ꢀ
2. When you first open Prusa Slicer you will be greeted by a setup-wizard. If you accidentally clicked away this screen, don’t worry, it can be accessed again at any time by going to Configuration - Configuration assistant.
From this menu it’s important that you select the correct printer and nozzle size.
Choose Original Prusa i3 MK3 and the 0.4 mm nozzle alternative. On the following screens you can just click ”next”.ꢀ 3. You need a .stl-file to print! This can be obtained from your favorite CAD-software or by downloading one you like, for example from thingiverse.comꢀ
4. You can add the model to the program by going to File - Import STL. Or by dragging and dropping it in the window.ꢀ
5. If required, the model can be moved around or even resized. When placing the model keep this in mind:ꢀ
•Avoid steep overhangs whenever possible. Gradual or small overhangs are fine.ꢀ
•Try to keep the "center off mass” as low as possible.ꢀ
•Sometimes it can be difficult to get the placement of the model(s) absolutely perfect, hence it can be useful to use the ”place on face” and ”auto arrange” buttons.ꢀ
6. Select the material that you wish to use, like Prusament PLA or Prusament PETG.
You have to set this to the material that is in the printer when you print!
Otherwise the printer may get damaged! For the Prusa machine, PLA will be the best material for most cases. If you wish to print with ABS or ULTRAT, then you should use the ZORTRAX printers. Note that we don’t have any profiles for generic filament from 3D-Prima. For these the Prusament profile will be fine.ꢀ 7. Select the Print settings of the print by selecting one of the different profiles. 0.2 mm
SPEED is perfect for most prints. Finer layers are possible at the cost of print time.ꢀ
8. Infill is always recommended, this will fill your model with a zigzag pattern, helping to increase its strength and printability. Standard (20 %) is recommended for most prints. Higher percentage of infill will usually yield a stronger part at the cost of increased weight and print time. Avoid infills close to a 100 %, this will usually cause problems.ꢀ
9. If your model has very small flat areas touching the bed, the Brim setting can be used.
This will print a bit of extra material around the bottom of your model to make it stick better.ꢀ
10.The printer can not print in mid air, therefore, a thing called Support exists. This is sacrificial material that holds up plastic that would otherwise not be able to be supported. Support is recommended if you have any large overhangs. You can select to add support everywhere, then the printer will add support wherever it feels necessary. If you select Only from buildplate, then the printer will only build support that touches the build plate.
It is also possible to add supports where you want them with Support Enforcers and Support Blockers. Support will only be built from areas with enforcers and removed from areas with blockers.
This mode is activaded by selecting support enforcers from the support menu and then added by right clicking the model and selecting add Support enforcer/blocker.ꢀ 11.When you’re happy with your settings, you press Slice now and you will get a preview of the sliced model. You can use the slider on the right to scroll through the layers. ꢀ
12.If you’re happy with the model, you press Export G-code, and save the code to the SD-Card, which is located to the left on the front LCD-screen. A SD-Card to USB adapter is located in the drawer under the printers.ꢀ
13.Verify that the material that you’ve selected is loaded in the machine, If not, the material can easily be swapped.ꢀ
•
Turn on the printer and navigate to Unload filament and select the type of material that is currently in the printer. When it is up to temperature, press the knob to unload the filament. Grab the filament immediately! If it gets stuck and you are unable to remove it, navigate to load filament, when it is done loading, you can try and Unload filament again.ꢀ
•When storing the filament, put the end of the filament in the spool according to the image!
•Take the new filament and using a pair side cutters, cut off approx. 4 cm of the end. This ensures that the printer can grab the material.ꢀ
•Put the material on the spool holder and feed the material manually through the hole in the extruder. Select load filament, And the filament should load. 14.Before starting every print the bed needs to be cleaned with Isopropanol alcohol
(IPA). This is usually located next to the printer in a spray-can. Spray the bed and wipe it down with a paper towel. If you forget this step you might have trouble with the print sticking to the bed. NOTE! For printing PETG you must prepare the surface with a thin layer of glue stick (also located in the drawer), this will ensure that the print is removable after the print is done.ꢀ
15.When the bed is cleaned and the file is prepared on the SD-Card. Navigate to Print from SD. Find your model and select it. The printer will warm up and then start. If it says that the firmware needs to be updated you can just press the button to ignore it.ꢀ
16.When the print is done it needs to be removed from the build plate. ꢀ
•
The build plate can be removed. This is done by lifting the build plate (it’s fixated via magnets).ꢀ
•
To remove the model you don’t need any special tools. Just bend the buildplate a couple of times and it should pop off.ꢀ
•Clean the build plate by removing any leftover plastic and place it back on the printer.ꢀ
17.Pat yourself on the back! You’ve just 3D-printed something!!ꢀ
Prusa Research Guide