Make Your Own Old Fashioned Lye Soap
Making Lye From Wood Ashes
(Homemade soap is becoming very popular. The main advantage is that it's generally pure and free of chemicals. When you make it, you know what's in it, and you know it's safe. Many of us get a sense of satisfaction from doing things ourselves, or at least knowing we could if we had to. Making soap the old fashioned way, before the availability of commercial lye (sodium hydroxide), is just one more skill worth learning. It's a simple task, but only a handful of folks these days practice this once common skill, or even know how. In his series on making old fashioned lye soap, Glenn Wineland starts with one of the main ingredients in homemade soap: lye from wood ashes.)
I enjoy learning and practicing pioneer and primitive skills. Here are the steps I have used to make lye, which is one of three required ingredients for making soap. The other two necessary ingredients are water and fat, which will be discussed in a future article.
Gather Your Supplies
To make a reasonable quantity of lye, you will need at least enough wood ashes to fill a five-gallon bucket. What you are looking for is the white, paper-like ashes; not the black chunks of charcoal like wood. The best lye comes from the ashes of hardwood (oak, maple, etc.) and fruit woods (apple, etc.).
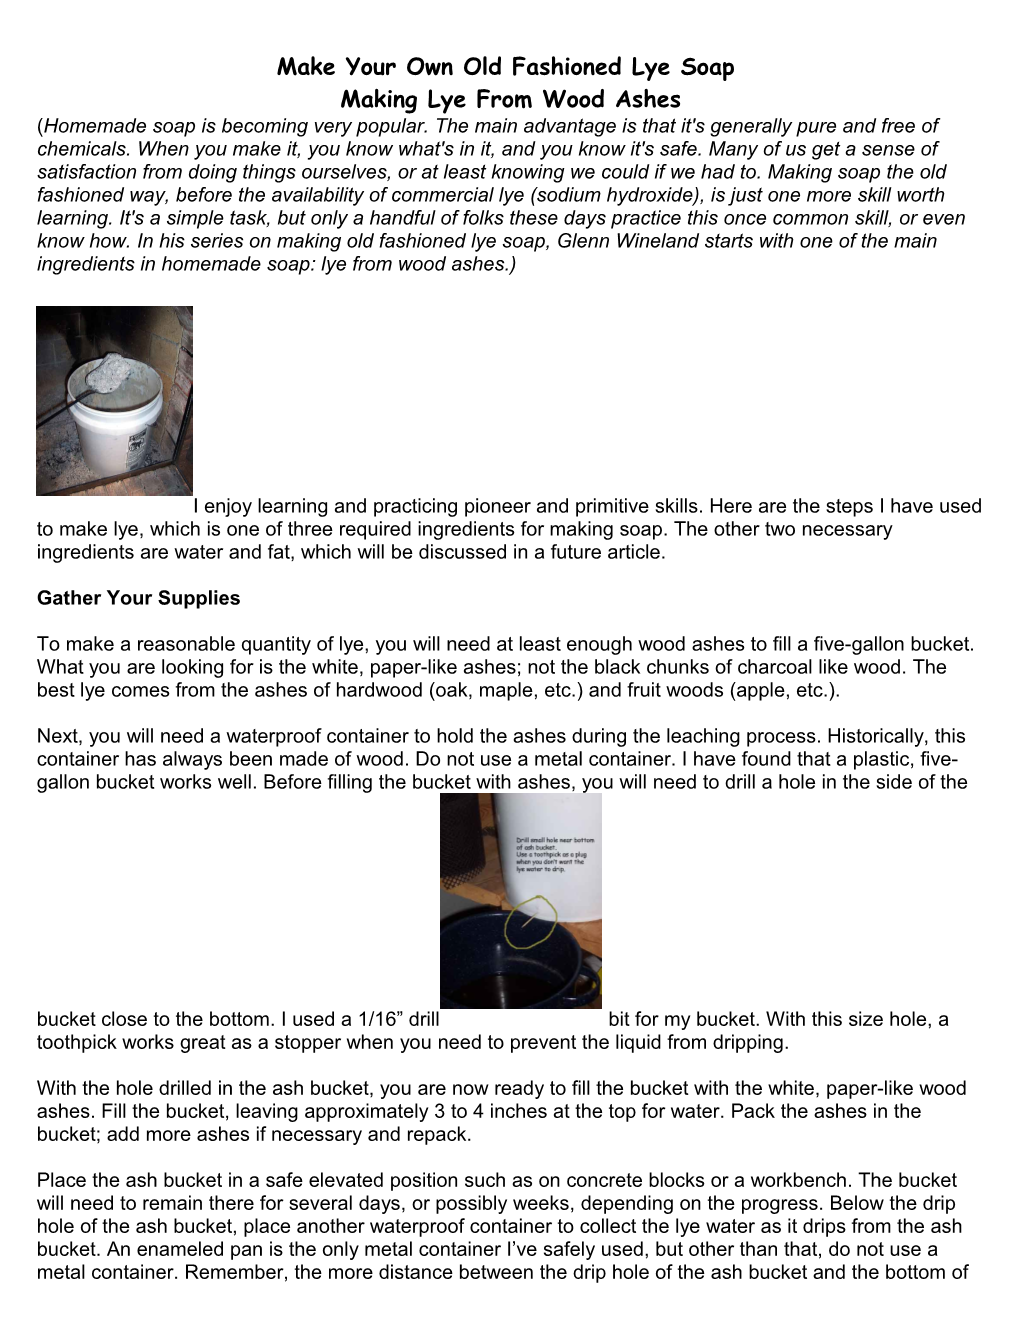
Next, you will need a waterproof container to hold the ashes during the leaching process. Historically, this container has always been made of wood. Do not use a metal container. I have found that a plastic, five-gallon bucket works well. Before filling the bucket with ashes, you will need to drill a hole in the side of the bucket close to the bottom. I used a 1/16” drill bit for my bucket. With this size hole, a toothpick works great as a stopper when you need to prevent the liquid from dripping.
With the hole drilled in the ash bucket, you are now ready to fill the bucket with the white, paper-like wood ashes. Fill the bucket, leaving approximately 3 to 4 inches at the top for water. Pack the ashes in the bucket; add more ashes if necessary and repack.
Place the ash bucket in a safe elevated position such as on concrete blocks or a workbench. The bucket will need to remain there for several days, or possibly weeks, depending on the progress. Below the drip hole of the ash bucket, place another waterproof container to collect the lye water as it drips from the ash bucket. An enameled pan is the only metal container I’ve safely used, but other than that, do not use a metal container. Remember, the more distance between the drip hole of the ash bucket and the bottom of the catch basin, the larger the splash will be. Take care not to damage surrounding areas with splashing lye water.
Making Lye Water
Now that you have your ash bucket with a small hole in the lower side, packed with wood ashes (leaving 3-4 inches at the top of the bucket for water), safely elevated, and a catch basin below, you are now ready to proceed. Use a broom handle, stick or other item to press a small hole or depression into the wood ashes. This will create space for the water to sit and begin the leaching process.
Next you will need 2 to 3 gallons of soft water. Rain water works best. Heat approximately one gallon of soft water to boiling. Carefully, pour the boiling water onto the packed wood ashes in the ash bucket. The boiling water will create a reaction in the ash bucket. Bubbling, spitting and splashing will occur as the boiling water reacts with the wood ashes. After this reaction calms, remove the stopper from the ash bucket. I typically add another gallon of boiling rain water after the reaction from the first gallon stops. It may take hours, or even days, before any lye water immerges from the ash bucket.
Recycled Lye
When the dripping (leaching) has stopped, replace the stopper. Be very careful when handling the lye water. It’s a good idea to wear rubber gloves and eye protection. Heat the lye water to boiling in an enameled pan. Next, carefully pour the boiling lye water into the same bucket of ashes. Ensure the catch basin is beneath the ash bucket and remove the stopper. This recycling serves to strengthen the lye water.
Recycle the lye water again, adding new ashes to the ash bucket (if desired) until the lye water is strong enough for making soap. One way to test the strength of the lye is by dipping a chicken feather into the lye water. If the feather begins to dissolve, the lye is strong enough.
Dried Lye
Once you have a strong lye water solution, you can dry the lye to a crystalline form. In crystal form, lye is easier to store and it also works well for many soap recipe measurements. Drying the lye can be accomplished by placing the lye water in the sun and allowing the water content to evaporate. As with the lye water, use caution with the lye crystals. Remember, do not use a metal container.
Lye made from wood ashes is potassium hydroxide, while Commercial lye (the kind typically sold in many stores) is sodium hydroxide. Some soap recipes make distinguishing differences in the amount of lye, depending on the type being used. They are generally not interchangeable.
Be Safe
Every potentially dangerous activity should have a disclaimer/waiver, so here’s mine: Lye is very caustic and can cause serious burns. In case of skin burns with lye, use vinegar, before water to neutralize the burn. I recommend long sleeves, long pants, gloves, eye protection, caution and common sense. Be safe.